

Types of Leather Stitching – Step-By-Step Guide for All Techniques
Leather is not only an essential industrial good but also a luxury element for many products. Professional quality skills are required to stitch leather. But if you’re a beginner and want to learn various stitching styles, you are in the right place. We are going to discuss different types of leather stitching here in a very simple way.
Though industrial machine stitching is used in many industries, there is no alternative to sew leather by hand. Many crafters choose this way of sewing to add more value and a professional look to their leather products. They apply several stitching methods for maintaining a class.
It’s not that difficult to bring precision in one’s stitching if sewing leather through the leather sewing machine for the first time. Firstly, you must have the proper equipment to save yourself from any inconvenience during stitching. Secondly, apply various sewing styles to please your customers.
You can follow our mentioned easy steps to become a pro in leather stitching. So, let’s have a look at different types of leather stitching.
The Single Stitch
The simplest form of stitching leather is the single stitch. You don’t need two needles as it is a must in saddle stitch. You can do this stitching style in two ways.
Method 1
One method is to pass the thread through the needle and make a knot somehow. This way, you can pull the thread tightly.
In this method of single stitching, you have to place the thread in the needle’s eye. Then, take the thread’s other end and keep it on the needle. Now, muffle the thread 3-5 times on the needle. Pull the thread upwards so that the knot can go towards one side of the thread. When the knot moves to one side, lock the other side onto the needle’s eye. After doing that procedure, you can start stitching by passing the thread through the first hole while the knot is fixed at the backside.
Method 2
The other method is easier than the former procedure. In this one, you can straight stitch by putting the thread in the needle’s eye as you normally do for hand stitching. It’s important to leave an inch or a bit more than that at the leather’s rare side.
You have to hold the excessive piece of thread as you keep on sewing. To make the stitching tight, go for a few back and forth stitches. Then you can freely pull the thread without any fear of coming off of the thread from the holes entirely. It also looks neat at the back because there is no knot but a burnt-off pressed thread onto the leather.
Z Stitch
For Z stitch, you have to follow the same procedure as you do in the simple stitch. It’s all up to you how do you start the stitching process. As the stitching will be on the very extreme edges of your object, so go for the knot method.
Start stitching from the inside and pass the thread from the first hole to the opposite hole a few times to make it fully secure. By wrapping the thread on the starting two holes, you’ll be pretty sure it will be a secure start. After that, proceed by crossing down to the second hole following the hole you were securing the thread. This was the second hole on the right side. Now go to its opposite hole from the backside. Pass the needle through the hole and wrap the thread through the same second hole of the right side to make the bottom of “Z”.
Inside the leather, the stitching will go in parallel line while on the outer side, cross stitch leather will look neat in the shape of “Z”. Then keep on repeating the same steps from the third hole onwards to make the same pattern.
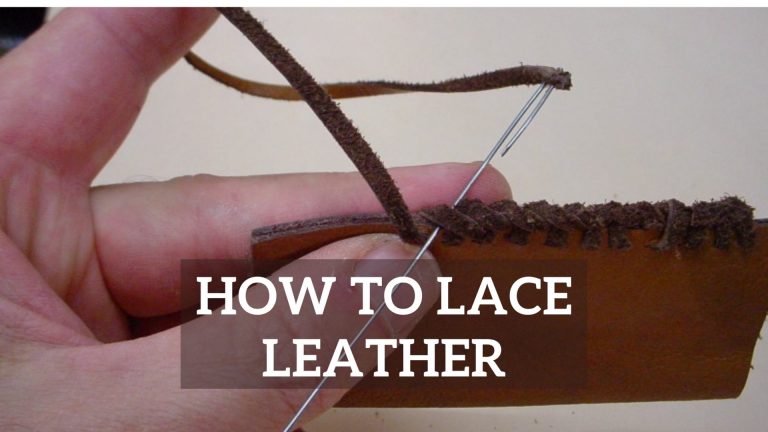
Butt Stitch
There are different types of leather stitching methods. Some are too easy, while others are time-consuming and require more practice for awesome results. The above two methods were too simple and can be done with one needle.
This one is a double-needle stitching procedure that is ideal for stitching different pieces together. This incredible technique is appropriate for stitching leather to wrap around the steering wheel or a flask. This way, a minimum thread seems on the top, and the stitching looks so sophisticated. So, it’s a better alternative to the blind stitch leather sewing technique.
Get two needles with the threads within and locked also. Both the pieces of leather should have parallel holes. Now use an awl for pushing it through the sides of both leather pieces to put holes in them. It’s really important to put holes on one side of the leather without breaking the upper layer. Numerous types of leather stitching awls are available in the market; make sure you buy the right one.
When using thin leather, make sure the top layer doesn’t tear when piercing the side holes. To make holes with precision, try to push the needle more towards the bottom. If the bottom layer of leather affects a bit, it won’t damage the top layer.
After completing this initial procedure, now go towards the next step. Make the needle pass through the side of the leather towards the bottom of the other piece. Then, from under the first hole of the left side leather, let the thread pass onto the next right hole. The threads of both needles will not be visible on the top.
It may sound unclear before starting, but once you try the steps one by one, everything will become easier.
When you are done with the entire process, finish leather stitching by burning the remaining thread. Using any tape or adhesive material will be better to keep the pieces firm in their place.
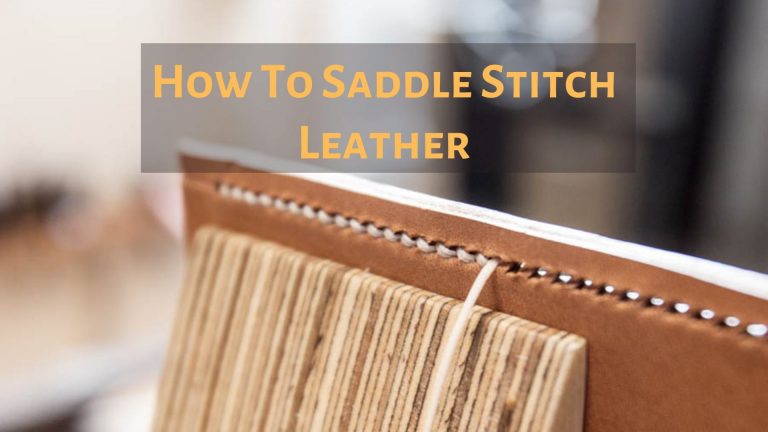
Saddle Stitch
It is a popular technique among artisans to double stitch leather with perfection. It is used to make different leather items, especially wallets. This technique is unique in the precision and strength you can never expect from a handheld sewing machine. In this method of stitching, you’ll pass the needle twice from the same hole. It means you’ll witness the same row having two stitches.
Leather stitching pony is a beneficial tool for comfortable functioning. So, you can use it for stitching in a more relaxing manner. Start your work by passing the needle through the first hole while keeping the equal length threads in both needles. Hold one needle in the left while another one in the right hand.
In saddle stitching, it’s essential to be consistent in the motions you do. You have to use the same hand for the next stitch. With both the needles in your handles, you will insert them in the same way throughout the stitching process.
Insert the needle in the first hole from the left side and take the thread away. Now put the next needle from the right side in the same hole. Tightly pull the thread away after passing through the holes to give the saddle stitching leather a nice look. Now Back stitch leather to make it perfectly tight.
Box Stitch
Once you learn saddle stitch, the box stitch is not difficult to execute. It is the same procedure, but you have to stitch it like a box shape. So, follow the same back and forth stitches but do it at a specific angle.
Start stitching by placing the needle through the first hole of one leather piece and passing it to the bottom of another piece. From there, pass it through and then take the thread away to make it tight. Then insert the needle in the following hole back and forth and keep doing the same procedure until you reach the finishing point. This stitching is perfect for securing two leather pieces wrapping any object.
Cross Stitch
Cross stitch resembles the Z stitch, but here you’ll be stitching the X shape. First of all, be careful in punching the holes. You can use different types of leather stitching awls for making holes precisely. Make sure the holes of the two pieces are parallel to each other. You can try this method for stitching box corners or any flat pieces of leather.
Cross stitch leather by passing the thread from one hole to the other to make it equal on both sides. You can topstitch leather with a parallel line for secure threading or start with an X shape. Cross the needle of the left side to the right side’s second hole and do the same procedure from right to left. By diagonal threading, you will keep on making X shape throughout the fabric. This decorative leather stitching will look amazing on every leather product, including a quilted leather jacket.
At the back, cross the threads to the opposite hole, which will make a straight line. By crossing from the same side every time, you’ll get a uniform look in your stitching. When you reach the end, reverse stitch leather or tie the thread at the backside for secure finishing.
Baseball Stitch
This stitching method has got that name because the same stitching is found on baseballs. One of the superb leather stitching designs; the V shape that goes from top to the end, giving a nice look to your creations. Leather awl punch to make a start. Keep the two pieces in a way that their holes remain parallel to each other.
Keep the threads parallel for a perfect start. You can begin stitching by making a parallel line at the top to make the stitching secure. Now you are all set to give it a start, so begin from the right side. Take the thread over the right side leather, then move it towards the back of the left side’s second hole. From there, it passes through the hole upwards, and this way, a diagonal line creates.
Then use the left side needle to do the same procedure. Now you’ll see the V shape design, which you have to complete till the end of the pieces. It is really important to start from the right to left or left to right all the time to give it a neat and sophisticated look. Burn or cut the extra thread at the backside of the leather to end the stitching.
Blanket Stitch
You can blanket stitch leather to decorate the edges beautifully. It is a wonderful technique used for blankets, fabric ornaments, and dishcloths, etc. You can conveniently join non-fraying cloths’ rough edges. This decorative leather stitching is ideal for fabrics like fleece. Hemming leather is much easier if you prefer blanket stitch.
FAQs
How do you sew a cross-stitch on leather?
For sewing cross stitch on leather, you have to equalize the threads on both leather pieces. Then, start making X shape by crossing over the right side and diagonally passing the thread into the second hole of the left side. Follow the same procedure from the left side to complete the X shape. Keep on threading diagonally till the end to get the perfect cross-stitching.
What is leather stitching called?
The leather stitching technique that artisans use to sew leather by hand is called saddle stitching that doesn’t involve a sewing machine needle.
What tools do I need to sew leather?
Following are the tools required for leather stitching:
- Sewing needles
- Waxed thread
- Awl for punching holes
- Small clamps or binder clips
- Pen (optional)
How to baseball stitch leather?
The baseball stitching makes a V shape on the entire fabric. For creating this amazing design, keep both leather pieces fully close to each other. From above the right side, the thread goes under the second hole of the left side and passes through it towards the upside. Then make the other diagonal line by following the same procedure vice versa. Always start from the same side to take your stitching to the pro level.
Bottom Line
Here we discussed different types of leather stitching because every time, you can’t use the saddle stitching method or manual sewing machine to save sewing machine cost. By trying different stitching procedures, you can polish your crafting skills and give an innovative look to your creations. When you go for various stitching procedures, you can explore new and the easiest methods to reduce your time consumption when you sew patches on leather.
It’s better to practice a bit before starting the proper crafting projects. Take small leather pieces and try the procedures one by one by following the steps discussed above. It will help you determine which stitching procedure will be best suited for which purpose when you don’t go for a sewing machine for beginners.
![Why Does My Sewing Machine Keep Jamming [Causes+Solutions]](https://stitchingnerd.com/wp-content/uploads/2021/11/Why-does-my-Sewing-Machine-keep-Jamming-768x432.jpg)